Category Archives: HowTo
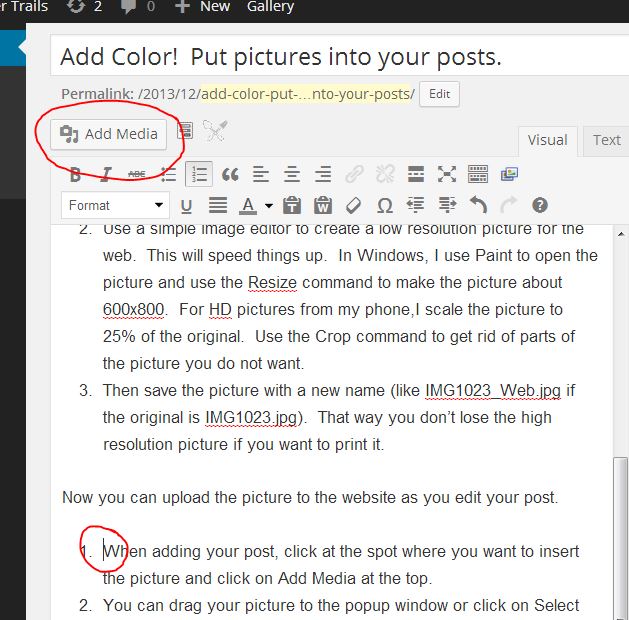
Add Color! Put pictures into your posts.
 There is a saying, “a picture is worth a thousand words”. At least a picture makes your post more attractive.
Adding a picture is quite easy. First you want to save the picture on your computer and resize it so you can upload it quickly and so viewers don’t have to wait long to see it.
- Load your pictures onto your computer. (Remember where they are!!)
- Use a simple image editor to create a low resolution picture for the web. This will speed things up. In Windows, I use Paint to open the picture and use the Resize command to make the picture about 600×800. For HD pictures from my phone,I scale the picture to 25% of the original. Use the Crop command to get rid of parts of the picture you do not want.
- Then save the picture with a new name (like IMG1023_Web.jpg if the original is IMG1023.jpg). That way you don’t lose the high resolution picture if you want to print it.
 Now you can upload the picture to the website as you edit your post.
- When adding your post, click at the spot where you want to insert the picture and click on Add Media at the top.
- You can drag your picture to the popup window or click on Select Files to find your picture.
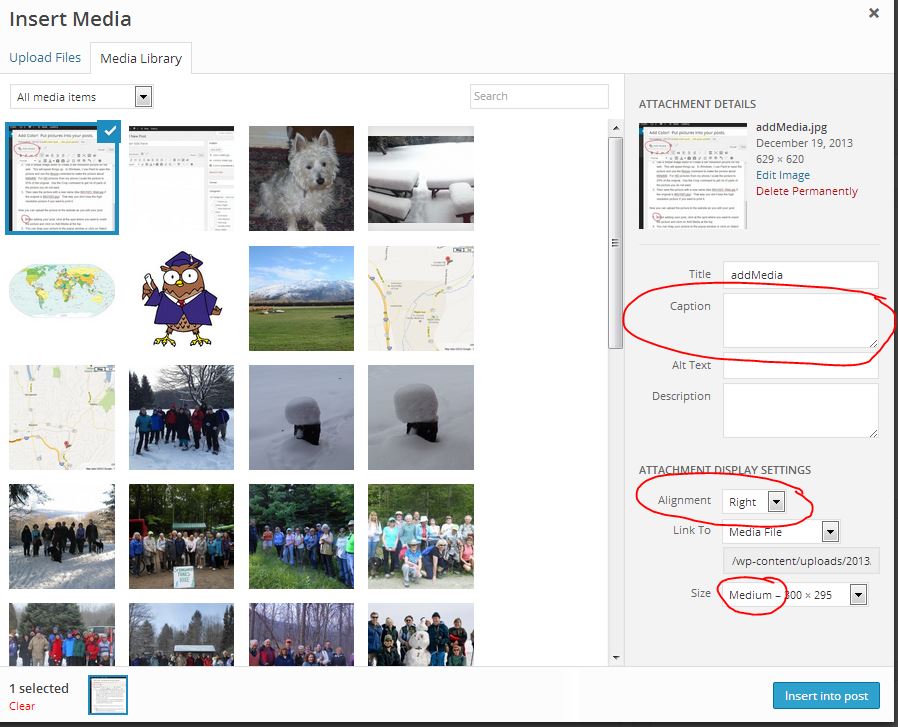
You will want to select an Alignment – either the left or right side of the column. I find I like to alternate between right and left alingment. Also, set the Size to Medium. And enter a caption if you wish.
Updated Feb 3, 2014
Pam is getting proficient at adding reports about our hikes. However, the pictures are still frustrating to her. So here are some hints to help with pictures.
The most common problem I have seen is caused by how the pictures are displayed. In order to support different width browsers, pictures will float. I have suggested that you alternate between aligning on the left and right. This staggers the pictures and tends to avoid getting them on top of each other. Since the setup doesn’t actually allow pictures on top of each other, the lower one will often float down (I guess I should say sink down) with results that can be surprising. So, here is my hint:
Put in your words first. This allows you to focus on your story. Get the flow right. Edit your story until you are happy with it. You may want to use your favorite editor and paste it into the blog editor when you like how it reads.
Add one picture per paragraph. This separates your pictures and makes it easier to read. To add a picture, click at the beginning of the paragraph, and then click on the Add Media button. The paragraph will get pushed to one side to make room for the picture.
Add more pictures as a gallery. If you have more than one picture per paragraph, you can add a picture gallery at the end of your post.
- Click your mouse after the last bit of text.
- Press the Add Media button
- Click on Create Gallery on the left sidebar. You still will be looking at the Media Library, although it will say Create Gallery at the top, rather than Insert Media. You can upload more pictures by dragging them from your computer to the browser.
- Click on the pictures you want to include in the gallery. You will see that they are checked.
- Click on Create Gallery button in the lower right corner.
- There are three settings: Link to Attachment Page, Columns: 3, and Random Order.
- Link to Attachment Page means that when a user clicks on the picture, they will get a page with a title and your caption and a larger picture.
Link to Media File will bring up just the picture at full resolution.
Since Link to Attachment Page is faster, I prefer it. - Columns 3 is clear. Don’t go above 3 columns because our newsletter column is narrow.
- Checking Random Order causes the gallery to rearrange each time you view it.
- Link to Attachment Page means that when a user clicks on the picture, they will get a page with a title and your caption and a larger picture.
- Finally click on the Insert Gallery button in the lower right.
Add your own hike report to SpringwaterTrails.org
Members of Springwater Trails are always welcome to add their own information to the Springwater Trails website. Hike planners write up a hike announcement which appears on the first page of the website. Hikers who enjoyed a hike can post their own report telling interesting stories.
A couple of suggestions as you compose a post. Avoid including last names, phone numbers and personal addresses. The website is a public forum and this private information does not mix well. And, get permission before you post pictures of identifiable people. Also, any offensive posts will be immediately removed.
 Your first step is to register on the website. Click on “login” and then select
 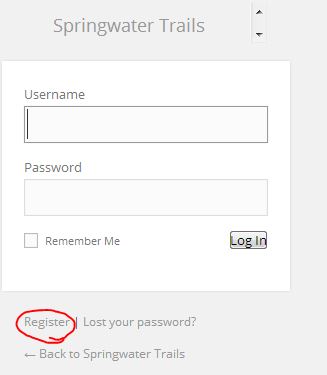 “register”. Remember the password you choose. I use 1password to store and recall all of my passwords. Once you create a login, you can comment on any stories on the website. Before you can create a new story, I need to set you up as a contributor. If it takes too long, send me an email at [email protected].
On the website, hike announcements and reports are called posts. You must log in to create a new post.
- When you log in, you will be placed on the dashboard. If not, you will see a black bar at the top. Under “Springwater Trails”, select Dashboard. If the black bar isn’t available, try entering the address https://springwatertrails.org/wp-admin/.
- In the upper right corner you should see “Screen Options”. Click on that and uncheck Quick Draft. You don’t need to do this again, and you won’t be confused by the Quick Draft which we do not use.
- Click on Posts on the left menu, or, in the “At a Glance” area, click on the Posts link.
- This is where you will see your own posts.
- To create a new post, click on Add New at the top or on the left menu to add a new post.
- Type in a title.
- Type in your story. Think like a reporter. Do you remember the five W’s of a good story?
- Include one or two pictures for interest.
- Help direct your readers to additional information with hyperlinks.
- The newletter articles are selected based on the category you assign. So always make sure you select a category. The following categories appear in the newsletter:
- Sunday hikes — for hike announcements prior to the hike.
- Hike Reports — for reports about the hike after the hike occurs.
- Education — for interesting stories that are educational.
- Recipes – share the recipe for the dish you brought to the social.
- Hints — Hints that other members may find useful.
- HowTo — Instructions
- Maintenance — Stories about how to plan and maintain hiking trails.
- Conditions — notices to hikers about trail conditions.
- You may set tags to help searches. I usually do not.
- Set a featured image. This will show up as a link to the story if the user is reading a different page of the newsletter.
- Leave the Format as “Standard”.
- If it takes you a few times to finish a story, you can Save Draft while you step away. Click on Publish or Submit for Review when you are ready to have the story appear on the website. If you would like the story to appear at a specific time in the future, you can edit the publish date above the Move to Trash button.
Allow readers to learn more – add a link to your post
It will make your post more interesting to read if you include links to additional information. For example, if you mention that Poison Ivy has been seen on the trail, you may want to allow your readers to learn more about Poison Ivy. Pick a web page you find interesting and link it to the word Poison Ivy. I like to link to the webpage of the park where we are hiking in the first couple of sentences.
- Write your sentence introducing the location of the hike.
- Highlight (or select) an appropriate word to make a link.
- Then click on the icon of a chain to add the address of the new page.
- Enter the URL of the page you want to go to from the Address bar of your browser.
- If you want to link to a Springwater Trails post, click on the “Or link to existing content” and search for the page you want.
- Click Update to save the link.
- If you decide you don’t want the link, put the cursor on the word that links, and click the broken chain.
Remember, readers will appreciate a link that goes to an informative page. This may not be the first page that Google provides – I would tend to avoid pages with ads.