
 There is a saying, “a picture is worth a thousand words”. At least a picture makes your post more attractive.
Adding a picture is quite easy. First you want to save the picture on your computer and resize it so you can upload it quickly and so viewers don’t have to wait long to see it.
- Load your pictures onto your computer. (Remember where they are!!)
- Use a simple image editor to create a low resolution picture for the web. This will speed things up. In Windows, I use Paint to open the picture and use the Resize command to make the picture about 600×800. For HD pictures from my phone,I scale the picture to 25% of the original. Use the Crop command to get rid of parts of the picture you do not want.
- Then save the picture with a new name (like IMG1023_Web.jpg if the original is IMG1023.jpg). That way you don’t lose the high resolution picture if you want to print it.
 Now you can upload the picture to the website as you edit your post.
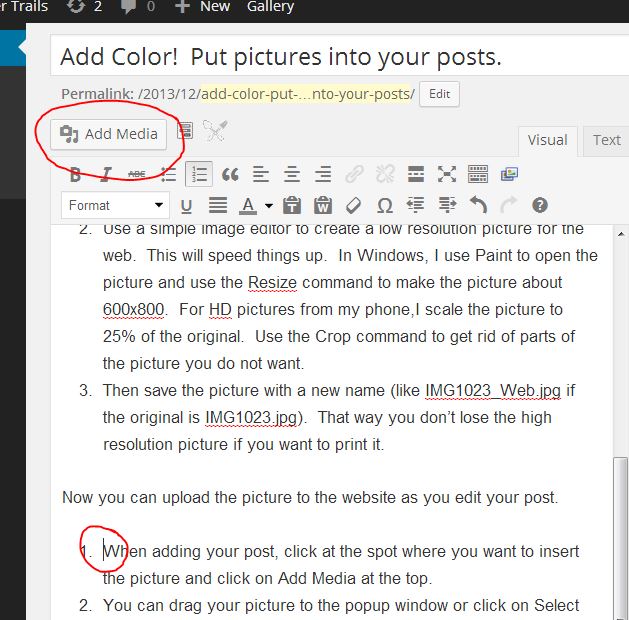
- When adding your post, click at the spot where you want to insert the picture and click on Add Media at the top.
- You can drag your picture to the popup window or click on Select Files to find your picture.
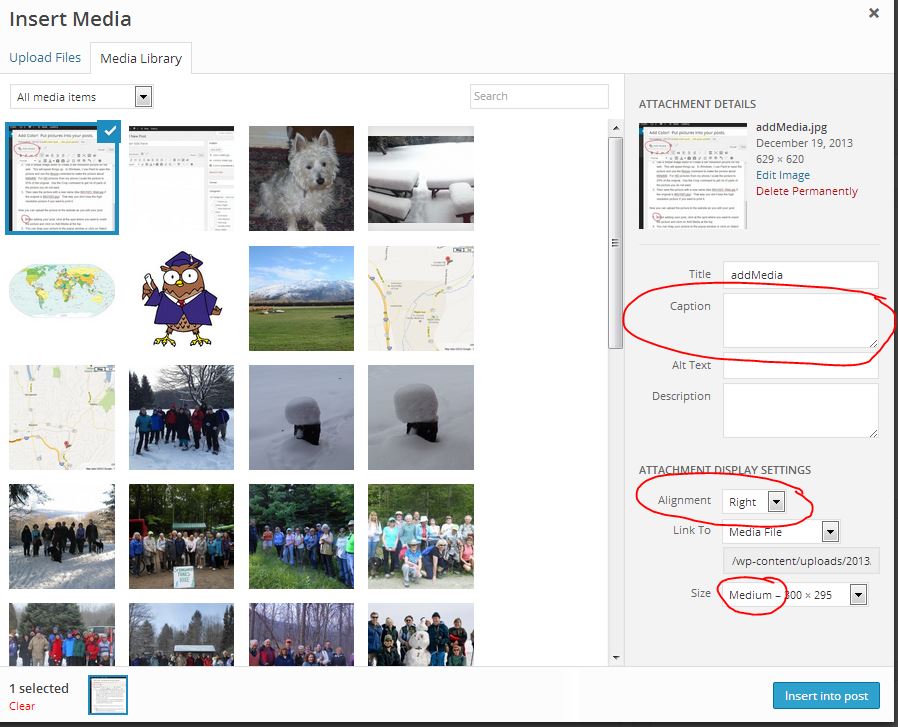
You will want to select an Alignment – either the left or right side of the column. I find I like to alternate between right and left alingment. Also, set the Size to Medium. And enter a caption if you wish.
Updated Feb 3, 2014
Pam is getting proficient at adding reports about our hikes. However, the pictures are still frustrating to her. So here are some hints to help with pictures.
The most common problem I have seen is caused by how the pictures are displayed. In order to support different width browsers, pictures will float. I have suggested that you alternate between aligning on the left and right. This staggers the pictures and tends to avoid getting them on top of each other. Since the setup doesn’t actually allow pictures on top of each other, the lower one will often float down (I guess I should say sink down) with results that can be surprising. So, here is my hint:
Put in your words first. This allows you to focus on your story. Get the flow right. Edit your story until you are happy with it. You may want to use your favorite editor and paste it into the blog editor when you like how it reads.
Add one picture per paragraph. This separates your pictures and makes it easier to read. To add a picture, click at the beginning of the paragraph, and then click on the Add Media button. The paragraph will get pushed to one side to make room for the picture.
Add more pictures as a gallery. If you have more than one picture per paragraph, you can add a picture gallery at the end of your post.
- Click your mouse after the last bit of text.
- Press the Add Media button
- Click on Create Gallery on the left sidebar. You still will be looking at the Media Library, although it will say Create Gallery at the top, rather than Insert Media. You can upload more pictures by dragging them from your computer to the browser.
- Click on the pictures you want to include in the gallery. You will see that they are checked.
- Click on Create Gallery button in the lower right corner.
- There are three settings: Link to Attachment Page, Columns: 3, and Random Order.
- Link to Attachment Page means that when a user clicks on the picture, they will get a page with a title and your caption and a larger picture.
Link to Media File will bring up just the picture at full resolution.
Since Link to Attachment Page is faster, I prefer it. - Columns 3 is clear. Don’t go above 3 columns because our newsletter column is narrow.
- Checking Random Order causes the gallery to rearrange each time you view it.
- Link to Attachment Page means that when a user clicks on the picture, they will get a page with a title and your caption and a larger picture.
- Finally click on the Insert Gallery button in the lower right.