Members of Springwater Trails are always welcome to add their own information to the Springwater Trails website. Hike planners write up a hike announcement which appears on the first page of the website. Hikers who enjoyed a hike can post their own report telling interesting stories.
A couple of suggestions as you compose a post. Avoid including last names, phone numbers and personal addresses. The website is a public forum and this private information does not mix well. And, get permission before you post pictures of identifiable people. Also, any offensive posts will be immediately removed.
 Your first step is to register on the website. Click on “login” and then select
 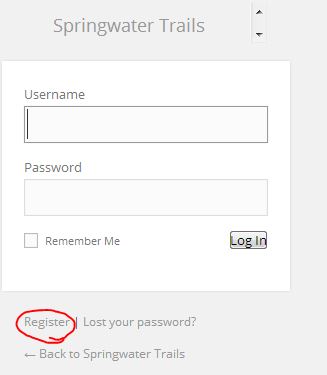 “register”. Remember the password you choose. I use 1password to store and recall all of my passwords. Once you create a login, you can comment on any stories on the website. Before you can create a new story, I need to set you up as a contributor. If it takes too long, send me an email at [email protected].
On the website, hike announcements and reports are called posts. You must log in to create a new post.
- When you log in, you will be placed on the dashboard. If not, you will see a black bar at the top. Under “Springwater Trails”, select Dashboard. If the black bar isn’t available, try entering the address https://springwatertrails.org/wp-admin/.
- In the upper right corner you should see “Screen Options”. Click on that and uncheck Quick Draft. You don’t need to do this again, and you won’t be confused by the Quick Draft which we do not use.
- Click on Posts on the left menu, or, in the “At a Glance” area, click on the Posts link.
- This is where you will see your own posts.
- To create a new post, click on Add New at the top or on the left menu to add a new post.
- Type in a title.
- Type in your story. Think like a reporter. Do you remember the five W’s of a good story?
- Include one or two pictures for interest.
- Help direct your readers to additional information with hyperlinks.
- The newletter articles are selected based on the category you assign. So always make sure you select a category. The following categories appear in the newsletter:
- Sunday hikes — for hike announcements prior to the hike.
- Hike Reports — for reports about the hike after the hike occurs.
- Education — for interesting stories that are educational.
- Recipes – share the recipe for the dish you brought to the social.
- Hints — Hints that other members may find useful.
- HowTo — Instructions
- Maintenance — Stories about how to plan and maintain hiking trails.
- Conditions — notices to hikers about trail conditions.
- You may set tags to help searches. I usually do not.
- Set a featured image. This will show up as a link to the story if the user is reading a different page of the newsletter.
- Leave the Format as “Standard”.
- If it takes you a few times to finish a story, you can Save Draft while you step away. Click on Publish or Submit for Review when you are ready to have the story appear on the website. If you would like the story to appear at a specific time in the future, you can edit the publish date above the Move to Trash button.